Robot Gripper Project:
Suitable for pretty much any age group from about grade 7 up, depending on how much preparation work you do beforehand. It can be made from a variety of materials such as cardboard with round toothpicks, to wood, plastic even metal and bolts. The choice is yours. Simply cut out the following parts and assemble them as shown. For the drive mechanism, a two 3cc syringes connected by 1/8″ I.D. plastic tubing and filled with water to act as hydraulic cylinders works well. As a high-tech alternative, servo motors from remote controlled cars could be used controlled by a computer using the printer port. For information on that, visit the “projects” area of the Hila science camp and research center at http:\\\fox.nstn.ca/~hila.
Parts:
Cut out four outer finger pieces, 2 cm X 13 cm. Mark out your hole centers approximately 1 cm in from each end. The important thing in all of the parts is not so much where you place the holes for the hinge points, but that the holes are spaced exactly apart from each other. On this piece, the two holes need to be exactly 11 cm apart. If you are making this out of cardboard and using toothpicks for your hinges, just mark the spots and poke your toothpicks through there. If you are making it out of other materials, drill the holes an appropriate size for the bolts you will be using.

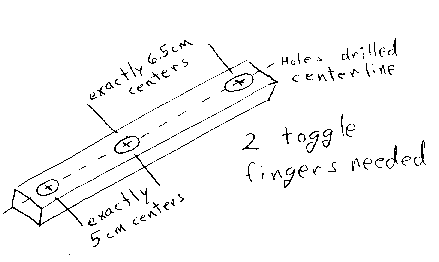
Cut out 2 toggle fingers, again 2 cm X 13 cm. Mark out three holes, starting at one end approximately 1 cm in and the second hole spaced 5 cm from that one, the third spaced 11.5 cm from the first one.
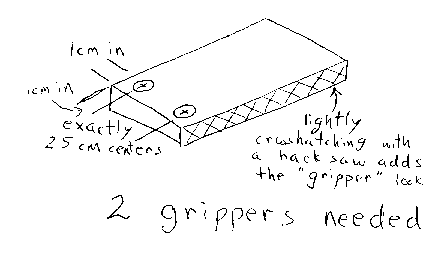
Cut out two grippers, 5 cm by 7 cm. Mark out two holes, 1 cm in from one side and spaced exactly 2.5 cm apart. If you are using wood, plastic, or metal you can use a hacksaw to make hatch marks as shown. This adds grip to the gripper.
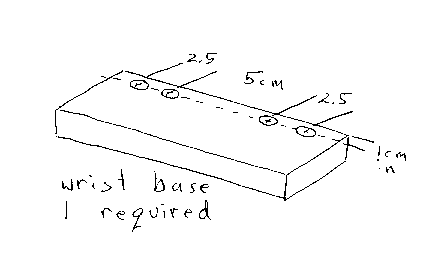
Cut out a wrist base, 13 cm X 5 cm. Mark out your first hole, 1 cm in from the front, 1.5 cm in from the left. Mark out your next three holes from that one at 2.5 cm, 7.5 cm and 10 cm.
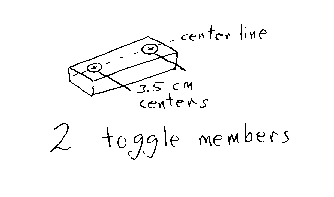
Cut out 2 toggle members, 5.5 cm X 2 cm. Mark your first hole on the length wise centerline at 1 cm in, and your second hole 3.5 cm from that one.
Lastly, cut out your actuator piece, at least 3 or four cm long and drill a hole in the end, centered, 1 cm in.
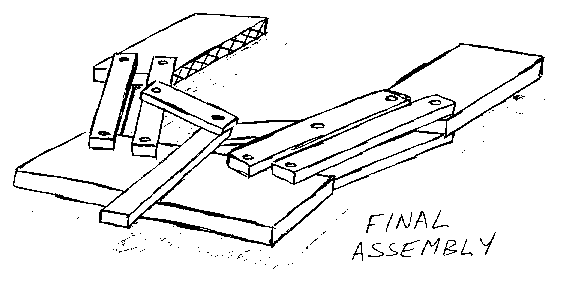
Put together the whole assembly as shown. Each outside finger is a pair of fingers, one mounted on the top of the assembly, the other underneath. The two toggle fingers are on the inside top. Notice the two toggle members are stacked, on on top of one finger, the other on the bottom of the other finger, with your actuator sandwiched in between the two.
To operate, merely move the actuator forward and back! You can operate it with a pair of syringes and tubing or you can mount and use a remote control car servo motor and control it by your computer. Visit the Hila science camp web site to see how to control the servo via your computer. Hila also has a rather large bank of educational ideas you can do.
Hila home page